Sunday, August 12, 2012

Zucchini Tart

IMG_2562


I have long had issues with Zucchinis.  I haven't liked them.  Sure I've made zucchini bread, and that's just fine, but I have really had a hard time finding recipes I enjoy that involve zucchini.  Which is why I never plant them in my garden.  However, my CSA has been providing me with zucchinis for the last two weeks and I really needed to find a way to enjoy them.

Luckily, I have found two so far!  I am starting with the second recipe I made, because wow, it was that good!
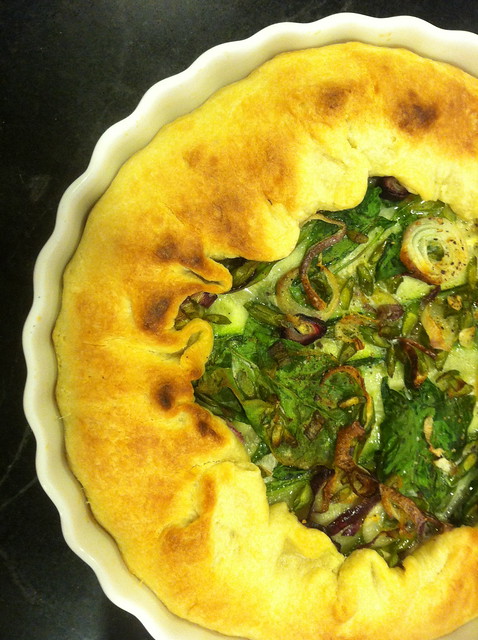
Zucchini Tart

Pastry dough ingredients:

2 cups of flour
dash of salt
1 cup of Earth Balance (or butter) cold
1/2 cup of almond milk
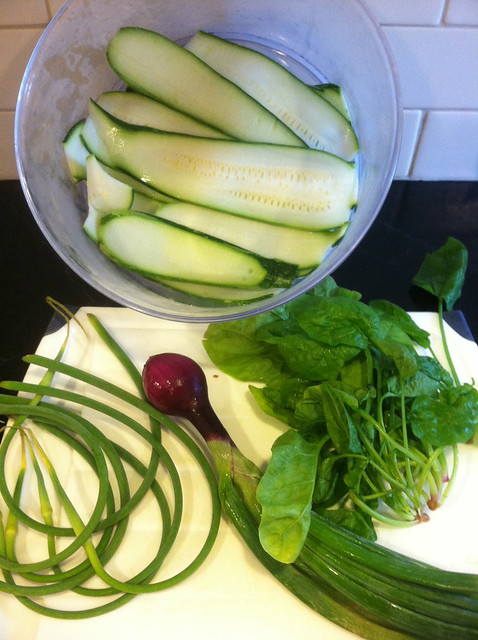
IMG_2555

Tart Ingredients:

4 tbs olive oil
1 large zucchini
1-2 spring onions (I used purple - I had them, and they are a pretty contrast)
3 garlic scapes (or you could use a clove or two of garlic)
1 handful of small spinach leaves
1/3 cup almond milk
Pesto (ingredients below)
Lemon pepper (optional)

Pesto ingredients:

Handful cilantro
Handful parsley
10-12 mint leaves
1 cup of raw cashews
2 cloves of garlic
1/3 cup olive oil
Juice of 1/2 lime
salt and pepper to taste

1. First make the dough by placing the flour in a bowl and adding salt.  Mix well, then cut the cold Earth Balance into it.  Add the almond milk and work into a dough.  Turn onto a floured surface quickly work into a ball. It shouldn't be a stiff dough, but if it seems too sticky add a small amount of flour.  Don't over work or allow the dough to get too warm.  The more you overwork it the less soft and flaky it will be. Place in the fridge while you prepare everything else and allow to chill.

IMG_2556

2. Slice onions, garlic scapes, and zucchini.  Zucchini should be sliced lengthwise 1/4 inch thick or you could slice it in circles 1/4 inch thick.  I did lengthwise.  Saute the garlic scapes and onions in a pan with 1-2 tbs of olive oil until soft.  set aside.  Add a little more olive oil (with the pan away from the heat) and add the zucchini in batches, cooking on both sides until soft and tender.  set aside

3. Make pesto.  Add to Vitamix (or blender) cilantro, parsley, mint, garlic, olive oil lime juice, salt & pepper, and cashews.  Blend until mixed.

4. Take the chilled dough out of the fridge and press into a tart pan or pie dish, making the bottom 1/4 inch thick and pressing the excess up the sides of the pan (higher than the edges).

IMG_2558

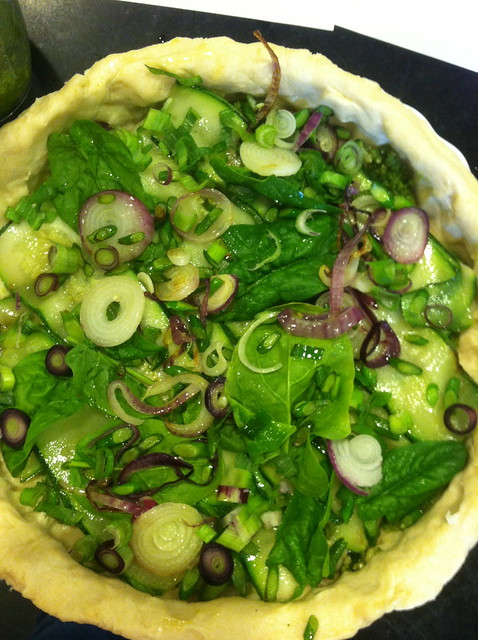
5. Layer in the pie dish: pesto, zucchini (I overlapped two layers of zucchini strips) onion and scape mix, spinach leaves.  Drizzle 1/ 4 cup of almond milk over the tart ingredients (reserve a small amount to brush on the edges of the tart dough). I lightly ground some lemon pepper on top of my tart.

IMG_2560

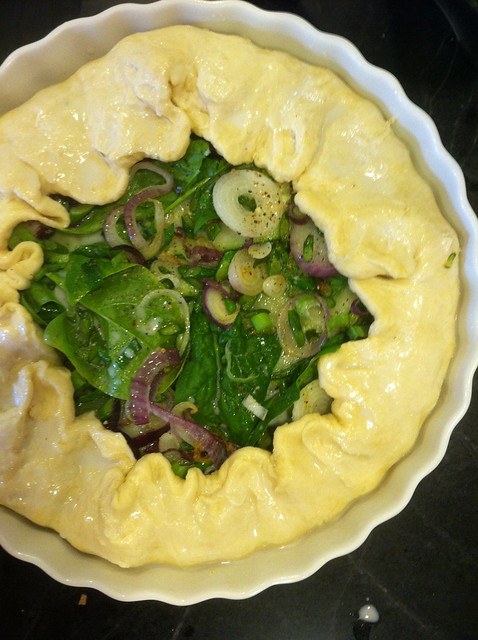
6. Fold the excess edges of the tart dough over the top of the tart.  Brush the exposed edges with almond milk.

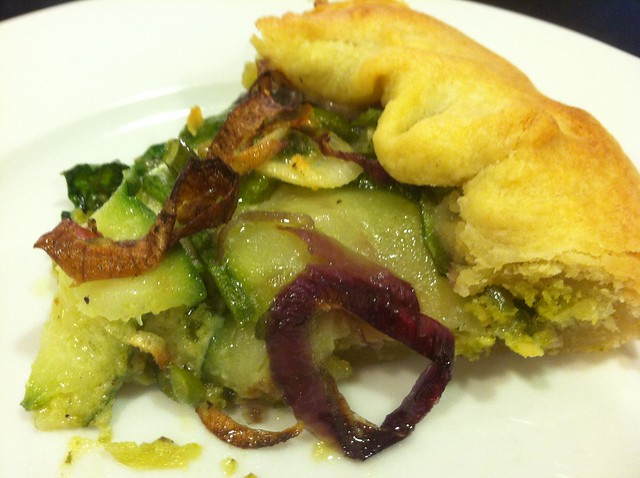
Bake at 350 degrees for 30 minutes, or until the edges start to brown.  Cut and serve warm. Serves 6-8.

IMG_2564

Sadly, I didn't take pictures of each step.  Even more sad, I took the pictures with my iPhone.  If I am to get serious about this posting, I need to drag out my real camera and be a little more methodical about this!  That being said, the next couple of recipes are also low on pictures and were taken with my phone.  Regardless, they are worth posting so 1) I can remember what I did, and 2) you can try it out for yourself!

Friday, August 10, 2012

Vegan. . . kind of

Garden Boxes

Sadly, I had used Mobile Me for quite some time for hosting and linking pictures on my blogs.  I forgot about the issue of disappearing pictures when Mobile Me ended in June.  Maybe one day I will manage to reload pictures on all past posts.  In the meantime, I have been sometimes posting pictures with recipes on Flickr and decided I would attempt to post on here once again. . . I'm not promising any sort of consistency, but I wonder sometimes if my Facebook friends get sick of me posting pictures of what I made for breakfast, lunch, and dinner! Ha!  At least here I assume that's what you want--though really it's as much for me to keep track as for anyone else.

At the start of this year I quit eating meat AND dairy (and for lent--which we attempted to participate in because Hannah thought it would be a fun challenge--we gave up sugar too!).  Many people (a number of my family members included) think my decision is strange, unnecessary, and silly.  Clearly I think otherwise.  While I did watch a number of food documentaries that sped me along the path to pseudo-veganism, the biggest reason I took the leap was health related.  First, I think eating a whole foods, plant-based diet is very healthy, and also, I have suffered from eczema and over-sensitive skin since I was a small child.  I got tired of it.  When I heard that a dermatologist recommended my niece try going dairy free to help with her eczema, I decided to try it too.  Lo and behold, vast improvement occurred!  Then we threw out meat for good measure! 

So while my family is largely vegetarian, I am the only one who eschews dairy completely.  As a whole, the rest of them east far less than they used to, and I think we are healthier than we've every been.  Eight months in and I am 12 pounds lighter as well as having softer, clearer, less sensitive skin than I have had in many years.  

This fresh attempt at keeping track of my recipes in one location will coincide with a fresh approach to eating. I am trying so many new things and I don't want to forget what I did and what I've tried that worked.  It is also the first year I have participated in a CSA (Community Supported Agriculture), and so I have my own garden produce and a load of fresh, organic produce from a local farm as well.  It's been great, but I have really had to work to find ways to consume all that produce!  It is forcing me to get creative and to try new things.  So far this year we have tried kohlrabi, garlic scapes, fava beans, and various new greens.  Also new: quinoa, chia seeds, hemp hearts, coconut and almond milk, and nutritional yeast.  Experimentation is fun!

With hope, I will maintain better than I did before, though with me working on my masters degree, and student teaching this fall and spring, I might need a little luck!

Wednesday, April 13, 2011

Main Street Caffe

Okay, so this isn't my recipe--I didn't even make it. But I know the woman who did, so that counts, right?  I went to high school with Andi.  She opened a cafe in our hometown about six months ago and has been posting the mouth watering specials on facebook ever since, making me wish I could swing by for lunch.  So while I was in Idaho for spring break I hightailed it over there with my mother and two sisters.

There is just something great about a small town cafe, and this one has certainly got charm--and fabulous fare to please the pickiest palate.

We each ordered a different panini and then split them four ways so we could try each one.  It was a tough call, but I am always partial to anything with basil in it, so my choice was also my favorite.

My oldest sister ordered the Turkey Pesto:


My other sister ordered theTurkey Bacon Avocado (probably my second favorite. . . because it has avocado on it!):


My mother ordered the Southwest Turkey:


And I ordered the Caprese Sandwich--YUM:


She added balsamic vinegar to her tomato, basil, mozzarella sandwich.  I'm going to try that next time I make myself one. . . like tomorrow! Now I'm hungry. . .

Three of us ordered our her spinach salad with cider vinaigrette, which was oh-so-good!  I would say it was definitely worth the trip.  I will have to stop by next time I am in town.  Check out Main Street Caffe HERE. Or their facebook page HERE (where Andi often posts the special of the day to get your mouth watering.)

And just so you know, I often take pictures of my food--and not just in my own kitchen.  People sometimes give me strange looks in restaurants when I whip out my camera (which is no small piece of a equipment) and snap pictures of my food before I eat it!

Do you ever take pictures of your food in public?

Tuesday, March 22, 2011

Lavender Ice Cream


I have often heard people speak of using lavender in cooking.  Lavender cookies have been on my "try" list for a while, but when I saw the movie "It's Complicated" recently, I decided I needed to try lavender ice cream.  The main character owned a bakery and spent half the show making lovely, mouth-watering creations--one of which was lavender ice cream.  It sounded interesting.  Or maybe I just wished for it to be summer so badly that the thought of making any ice cream created visions of warm weather and blue skies.

And while it may be difficult to reconcile the idea of lavender being edible, as opposed to something you might find in soap, or lotion, it has a subtle smoothness that combines with the other flavors to create a soothing, tea-like quality that is oh-so-yummy.  

You will need:

2 cups heavy cream
4 cups whole milk
4 Tbs dried, edible lavender flowers (for locals, I found mine at Chuck's Produce and Street Market)
3/4 cup honey
4 egg yolks
1 tsp vanilla
juice of 1 lime (1-2 Tbs)
1 tsp lime zest
1/2 tsp salt

Heat the milk and cream in a pot over medium heat until very warm, but not boiling.  Turn off heat and add lavender.  Cover and let steep for 20-30 minutes.  Then strain out flowers and discard them.  

Return milk/cream to pot, add honey and heat on medium low until honey has dissolved.  Do not allow to boil.

Beat egg yolks, vanilla, lime juice, lime zest and salt until light creamy yellow.  While stirring, slowly add 1 cup of warm milk mixture to egg mixture.  When well mixed, add the milk/egg mixture back into pot, stirring.  

Heat on medium low until it thickens slightly (5 - 8 minutes).  It should lightly coat the back of your spoon.  Strain to remove any possible lumps that may have formed.

Cool in refrigerator for four hours, or until no longer warm.  

Freeze and churn according to your ice cream maker's instructions.

Yield: 2 quarts

Sunday, February 27, 2011

Lime Bars

I am a girl who loves the changing of the seasons. . . but I am almost always ready for them to change before they are.  About this time of year I start craving spring in a major way.  It pops up in my clothing, my house keeping and decorating, my desire to hit the yard work, and in my kitchen.  I get the urge to grill things and make lots of citrus-y dishes.  So when my husband declared the need for dessert tonight, I vetoed the fudge brownies or cookies and suggested lime bars.  Yum.  So glad I did.  And since we had given in to the urge to buy raspberries yesterday, I threw some in for good measure.


I have posted many other citrus desserts, but this recipe is super quick, in case you get a hankering for spring and you need it now.


You will need:

1 1/2 cup of cracker crumbs (typically graham cracker, but I had none, so I crushed up lemon Girl Scout  cookies--yum)
6 Tbs butter, melted
1/4 cup sugar (which I didn't add--I figured with the lemon cream filling I was covered!)
Zest of one lime

Filling:

2 large egg yolks
1  14 oz can of sweetened condensed milk
1/2 cup lime juice (about 4-5 limes)

Heat your oven to 350 degrees.

For the crust, crush your crackers. . .


Then mix with your zest, butter and sugar.


Butter an 8x8 inch pan.  If you want to easily remove the bars from the pan after they have baked, line the bottom with parchment paper and up two (opposing) sides--so you can lift them out before cutting.

Pour the crust into the pan and press with a spoon or fork until evenly covering the bottom. Bake for 10 minutes. let cool slightly.


For the filling, combine the yolks, sweetened condensed milk and lime juice.


Pour over crust and bake for 15 minutes, or until set.  Cool completely.  If you used parchment, remove uncut bars from pan by lifting the parchment. Cut into squares, garnish as desired, and serve.


I garnished mine with whipped cream, a little more lime zest, and fresh raspberries.  It was springtime in my mouth.  Enjoy!

Monday, June 21, 2010

Lime Cilantro Dressing


I have mentioned this dressing in a couple recipes and have finally gotten around to sharing it with you.  I used to be a ranch only kind of girl, but I have been discovering there are a plethora of tasty toppings for  your salad out there!  This one has only recently been added to my arsenal, and doesn't stray too far from ranch since you actually use a ranch packet when you make it, though you don't follow the directions on the back.

You will need:

1 ranch mix packet
1 cup mayo
1/2 cup milk
juice from 1 lime
2 cloves of garlic
1/2 cup cilantro
1/4 cup green salsa (I used Arriba fire roasted Mexican Green Salsa)


Put all of it in the blender and blend.

Eat on salads, burrito bowls, with a spoon. . .


Store covered in the refrigerator for about a week. . . if it lasts that long.

Burrito Bowl

For a family that eats a LOT of Mexican food (sure, it's largely Americanized, but we love it all), I have to admit that this recipe has only recently entered my kitchen via my neighbor's kitchen. . . with a few alterations.  But that's what is great about this recipe, you can throw in what ever tinkles your taste buds, and every bowl can be customized.  It tends to be more of a burrito bowl bar at our house.

Start with rice-- sticky rice, white rice, brown rice. . . you pick.  We usually use brown rice.


Then pick your toppings.  Our favorites are:

peppers
onions
black beans
avocado
plum tomatoes
cheese
sour cream
cilantro


You can add salsa, or eat it with just your choice of toppings, but I love to add a little zing with Lime Cilantro Dressing.  YUM.


Pile it all in a bowl and try not to overeat, I dare you.